RDKit, Mordred, Morfeus & DBStep
Installation
Installation of RDKit
conda install -c conda-forge rdkit
Installation of Mordred
pip install mordred
Installation of Morfeus
conda install -c conda-forge morfeus-ml
Installation of Dbstep
conda install -c conda-forge dbstep
Dependencies
numpy
scipy
xtb-python (Morfeus)
Example notebook
RDKit: a cheminformatics package
RDKit is primiarly used for creation, and manipulation of chemical structures.
https://www.rdkit.org/docs/GettingStartedInPython.html
import rdkit #rdkit.Chem.SOMEFUNCTION
from rdkit import Chem #Chem.SOMEFUNCTION
Step 1: 2D smiles to 3D structure
RDkit deals with molecules as mol objects. These mol objects can be created from either 2D or 3D files. This mol object is the base to everything that is done in rdkit
m1 = Chem.MolFromSmiles('CCc1ccccc1')
type(m1)
This code will give the output rdkit.Chem.rdchem.Mol, showing
that m1 is a Mol type, or a mol object that rdkit can read as
a molecule. Next, we can visualize the molecule with:
m1
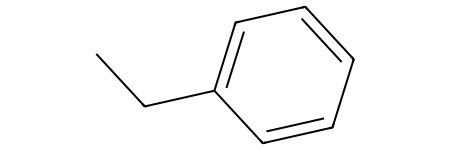
In addition to showing the molecule's structure, we can also see the coordinates of mol objects with rdkit:
#What is the coordinates of the molecule?
print(Chem.MolToMolBlock(m1))
Which will give the following output:
     RDKit          2D

  8  8  0  0  0  0  0  0  0  0999 V2000
    3.7500   -1.2990    0.0000 C   0  0  0  0  0  0  0  0  0  0  0  0
    3.0000    0.0000    0.0000 C   0  0  0  0  0  0  0  0  0  0  0  0
    1.5000    0.0000    0.0000 C   0  0  0  0  0  0  0  0  0  0  0  0
    0.7500   -1.2990    0.0000 C   0  0  0  0  0  0  0  0  0  0  0  0
   -0.7500   -1.2990    0.0000 C   0  0  0  0  0  0  0  0  0  0  0  0
   -1.5000    0.0000    0.0000 C   0  0  0  0  0  0  0  0  0  0  0  0
   -0.7500    1.2990    0.0000 C   0  0  0  0  0  0  0  0  0  0  0  0
    0.7500    1.2990    0.0000 C   0  0  0  0  0  0  0  0  0  0  0  0
  1  2  1  0
  2  3  1  0
  3  4  2  0
  4  5  1  0
  5  6  2  0
  6  7  1  0
  7  8  2  0
  8  3  1  0
M  END
One thing to note from the structure and coordinates is that there are no hydrogens. RDKit requires you to add explicit hydrogens if you want them to be a part of the molecule.
#Notice only C, no H?
m2 = Chem.AddHs(m1) #m3 = Chem.RemoveHs(m2)
m2
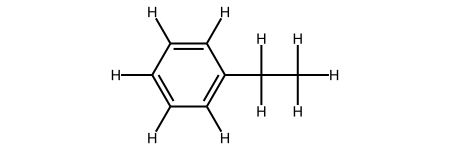
Then you can show the new coordiantes:
print(Chem.MolToMolBlock(m2))
     RDKit          2D

 18 18  0  0  0  0  0  0  0  0999 V2000
    4.5000    0.0000    0.0000 C   0  0  0  0  0  0  0  0  0  0  0  0
    3.0000    0.0000    0.0000 C   0  0  0  0  0  0  0  0  0  0  0  0
    1.5000    0.0000    0.0000 C   0  0  0  0  0  0  0  0  0  0  0  0
    0.7500   -1.2990    0.0000 C   0  0  0  0  0  0  0  0  0  0  0  0
   -0.7500   -1.2990    0.0000 C   0  0  0  0  0  0  0  0  0  0  0  0
   -1.5000    0.0000    0.0000 C   0  0  0  0  0  0  0  0  0  0  0  0
   -0.7500    1.2990    0.0000 C   0  0  0  0  0  0  0  0  0  0  0  0
    0.7500    1.2990    0.0000 C   0  0  0  0  0  0  0  0  0  0  0  0
    6.0000    0.0000    0.0000 H   0  0  0  0  0  0  0  0  0  0  0  0
    4.5000    1.5000    0.0000 H   0  0  0  0  0  0  0  0  0  0  0  0
    4.5000   -1.5000    0.0000 H   0  0  0  0  0  0  0  0  0  0  0  0
    3.0000   -1.5000    0.0000 H   0  0  0  0  0  0  0  0  0  0  0  0
    3.0000    1.5000    0.0000 H   0  0  0  0  0  0  0  0  0  0  0  0
    1.5000   -2.5981    0.0000 H   0  0  0  0  0  0  0  0  0  0  0  0
   -1.5000   -2.5981    0.0000 H   0  0  0  0  0  0  0  0  0  0  0  0
   -3.0000    0.0000    0.0000 H   0  0  0  0  0  0  0  0  0  0  0  0
   -1.5000    2.5981    0.0000 H   0  0  0  0  0  0  0  0  0  0  0  0
    1.5000    2.5981    0.0000 H   0  0  0  0  0  0  0  0  0  0  0  0
  1  2  1  0
  2  3  1  0
  3  4  2  0
  4  5  1  0
  5  6  2  0
  6  7  1  0
  7  8  2  0
  8  3  1  0
  1  9  1  0
  1 10  1  0
  1 11  1  0
  2 12  1  0
  2 13  1  0
  4 14  1  0
  5 15  1  0
  6 16  1  0
  7 17  1  0
  8 18  1  0
M  END
Now we have added hydrogens to our molecule! However, you can see from the coordinates that this molecule is in 2D right now (all z-coordinates are 0). To fix this, we have to generate a 3D structure of our mol object:
#going from 2D to 3D with proper coordinates?
from rdkit.Chem import AllChem
 # rdkit.Chem.AllChem.EmbedMolecule(m2,randomSeed=0xf00d)
AllChem.EmbedMolecule(m2,randomSeed=0xf00d)   # optional random seed for reproducibility)
print(Chem.MolToMolBlock(m2))
m2
Which gives the output as a coordinate block and an image:
     RDKit          3D

 18 18  0  0  0  0  0  0  0  0999 V2000
   -2.3976    0.1850    0.5701 C   0  0  0  0  0  0  0  0  0  0  0  0
   -1.6138   -0.1868   -0.6938 C   0  0  0  0  0  0  0  0  0  0  0  0
   -0.1705   -0.1457   -0.3518 C   0  0  0  0  0  0  0  0  0  0  0  0
    0.5315   -1.2300    0.1244 C   0  0  0  0  0  0  0  0  0  0  0  0
    1.8853   -1.1497    0.4335 C   0  0  0  0  0  0  0  0  0  0  0  0
    2.4910    0.0702    0.2394 C   0  0  0  0  0  0  0  0  0  0  0  0
    1.8408    1.1851   -0.2327 C   0  0  0  0  0  0  0  0  0  0  0  0
    0.4967    1.0651   -0.5283 C   0  0  0  0  0  0  0  0  0  0  0  0
   -2.2479    1.2901    0.7442 H   0  0  0  0  0  0  0  0  0  0  0  0
   -3.4538   -0.0835    0.4622 H   0  0  0  0  0  0  0  0  0  0  0  0
   -1.9001   -0.3130    1.4305 H   0  0  0  0  0  0  0  0  0  0  0  0
   -1.8850   -1.2311   -0.9487 H   0  0  0  0  0  0  0  0  0  0  0  0
   -1.8395    0.5285   -1.5133 H   0  0  0  0  0  0  0  0  0  0  0  0
    0.0058   -2.1670    0.2587 H   0  0  0  0  0  0  0  0  0  0  0  0
    2.3938   -2.0289    0.8048 H   0  0  0  0  0  0  0  0  0  0  0  0
    3.5420    0.1352    0.4786 H   0  0  0  0  0  0  0  0  0  0  0  0
    2.3706    2.1413   -0.3714 H   0  0  0  0  0  0  0  0  0  0  0  0
   -0.0494    1.9353   -0.9063 H   0  0  0  0  0  0  0  0  0  0  0  0
  1  2  1  0
  2  3  1  0
  3  4  2  0
  4  5  1  0
  5  6  2  0
  6  7  1  0
  7  8  2  0
  8  3  1  0
  1  9  1  0
  1 10  1  0
  1 11  1  0
  2 12  1  0
  2 13  1  0
  4 14  1  0
  5 15  1  0
  6 16  1  0
  7 17  1  0
  8 18  1  0
M  END
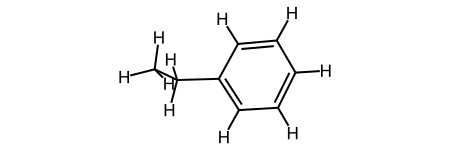
Based on the drawing of our molecule and the coordinates, you can see that we now have a 3D molecule! How it's time to save our molecule and be able to work with it outside of RDKit:
#can we wrtie it to a xyz file? sdf file?
from rdkit.Chem import rdmolfiles #https://www.rdkit.org/docs/source/rdkit.Chem.rdmolfiles.html
# write the 3D molecule to an xyz file
rdmolfiles.MolToXYZFile(m2,'molecule.xyz')
# write the 3D molecule to a pdb file
rdmolfiles.MolToPDBFile(m2,'molecule.pdb')
# write the 3D molecule to an sdf file
rdmolfiles.MolToMolFile(m2,'molecule.sdf')
# write the 3D molecule as a SMILES string
rdmolfiles.MolToSmiles(m2)
The last command will just print the new SMILES representation of the molecule:
'[H]c1c([H])c([H])c(C([H])([H])C([H])([H])[H])c([H])c1[H]'
Step 2: RDKit for molecular, atomic and bond properties
RDKit can obtain simple molecular properties. For example: number of atoms, number of bond, etc.
You can calculate the molecular weight of a molecule with:
# molecular weight
Chem.rdMolDescriptors.CalcExactMolWt(m2)
Which will output the weight:
106.07825032
You can also show things on an atom-by-atom basis, starting with listing all of the atoms in your molecule:
list(m2.GetAtoms())
Outputting:
[<rdkit.Chem.rdchem.Atom at 0x7fa779dd5740>,
 <rdkit.Chem.rdchem.Atom at 0x7fa779dd57b0>,
 <rdkit.Chem.rdchem.Atom at 0x7fa779dd5820>,
 <rdkit.Chem.rdchem.Atom at 0x7fa779dd5890>,
 <rdkit.Chem.rdchem.Atom at 0x7fa779dd5900>,
 <rdkit.Chem.rdchem.Atom at 0x7fa779dd5970>,
 <rdkit.Chem.rdchem.Atom at 0x7fa779dd59e0>,
 <rdkit.Chem.rdchem.Atom at 0x7fa779dd5a50>,
 <rdkit.Chem.rdchem.Atom at 0x7fa779dd5ac0>,
 <rdkit.Chem.rdchem.Atom at 0x7fa779dd5b30>,
 <rdkit.Chem.rdchem.Atom at 0x7fa779dd5ba0>,
 <rdkit.Chem.rdchem.Atom at 0x7fa779dd5c10>,
 <rdkit.Chem.rdchem.Atom at 0x7fa779dd5c80>,
 <rdkit.Chem.rdchem.Atom at 0x7fa779dd5cf0>,
 <rdkit.Chem.rdchem.Atom at 0x7fa779dd5d60>,
 <rdkit.Chem.rdchem.Atom at 0x7fa779dd5dd0>,
 <rdkit.Chem.rdchem.Atom at 0x7fa779dd5e40>,
 <rdkit.Chem.rdchem.Atom at 0x7fa779dd5eb0>]
Notice that the atoms you get directly from GetAtoms() isn't readable
to humans. They're still in the language of rdkit mol objects. We can
get the information in a readable format by looping through each atom in
the molecule and finding different properties from these atoms:
# can loop over every atom in the molecule
for atom in m2.GetAtoms():
    print(atom.GetSymbol(),atom.GetIdx(),atom.GetAtomicNum())
Which will give you:
C 0 6
C 1 6
C 2 6
C 3 6
C 4 6
C 5 6
C 6 6
C 7 6
H 8 1
H 9 1
H 10 1
H 11 1
H 12 1
H 13 1
H 14 1
H 15 1
H 16 1
H 17 1
Similar to getting atom information, we can also collect information about the bonds in our molecule:
list(m2.GetBonds())
[<rdkit.Chem.rdchem.Bond at 0x7fa779f293c0>,
 <rdkit.Chem.rdchem.Bond at 0x7fa779f29430>,
 <rdkit.Chem.rdchem.Bond at 0x7fa779f294a0>,
 <rdkit.Chem.rdchem.Bond at 0x7fa779f29510>,
 <rdkit.Chem.rdchem.Bond at 0x7fa779f29580>,
 <rdkit.Chem.rdchem.Bond at 0x7fa779f295f0>,
 <rdkit.Chem.rdchem.Bond at 0x7fa779f29660>,
 <rdkit.Chem.rdchem.Bond at 0x7fa779f296d0>,
 <rdkit.Chem.rdchem.Bond at 0x7fa779f29740>,
 <rdkit.Chem.rdchem.Bond at 0x7fa779f297b0>,
 <rdkit.Chem.rdchem.Bond at 0x7fa779f29820>,
 <rdkit.Chem.rdchem.Bond at 0x7fa779f29890>,
 <rdkit.Chem.rdchem.Bond at 0x7fa779f29900>,
 <rdkit.Chem.rdchem.Bond at 0x7fa779f29970>,
 <rdkit.Chem.rdchem.Bond at 0x7fa779f299e0>,
 <rdkit.Chem.rdchem.Bond at 0x7fa779f29a50>,
 <rdkit.Chem.rdchem.Bond at 0x7fa779f29ac0>,
 <rdkit.Chem.rdchem.Bond at 0x7fa779f29b30>]
To put the bonds in a human readable format, we can follow a similar procedure as the atoms:
# can loop over every atom in the molecule
for bond in m2.GetBonds():
    print(bond.GetBondType(),bond.GetBeginAtomIdx(), bond.GetEndAtomIdx(), )
SINGLE 0 1
SINGLE 1 2
AROMATIC 2 3
AROMATIC 3 4
AROMATIC 4 5
AROMATIC 5 6
AROMATIC 6 7
AROMATIC 7 2
SINGLE 0 8
SINGLE 0 9
SINGLE 0 10
SINGLE 1 11
SINGLE 1 12
SINGLE 3 13
SINGLE 4 14
SINGLE 5 15
SINGLE 6 16
SINGLE 7 17
You can also get these properties about specific atoms/bonds without needing to loop through every single atom/bond in your molecule, provided that you know the atom indices you're interested in:
# get the atom symbol of the atom with index 0
print(m2.GetAtomWithIdx(0).GetSymbol())
# get the explicit valence of the atom with index 0
print(m2.GetAtomWithIdx(0).GetExplicitValence())
# get teh formal charge of teh atom with index 4
print(m2.GetAtomWithIdx(4).GetFormalCharge())
# get the hybridization of the atom with index 7
print(m2.GetAtomWithIdx(7).GetHybridization())
# get the begin atom index of the bond with index 6
print(m2.GetBondWithIdx(6).GetBeginAtomIdx())
# get the end atom index of the bond with index 3
print(m2.GetBondWithIdx(3).GetEndAtomIdx())
# get the bond type between atoms with index 0 and 1
print(m2.GetBondBetweenAtoms(0,1).GetBondType())
Which will give you the output:
C
4
0
SP2
0
1
SINGLE
You can get a lot of different properties about atoms and bonds from rdkit, this was just a sample of what's possible. Check the RDKit Documentation for a full list of what you can find with rdkit.
One thing that you can do to help make descriptor generation easier is visualize the molecule wiht atoms labeled with their atomic symbol and index. Here, you can define a function which will do this:
def mol_with_atom_index(mol):
    for atom in mol.GetAtoms():
        atom.SetAtomMapNum(atom.GetIdx())
    return mol
mol_with_atom_index(m2)
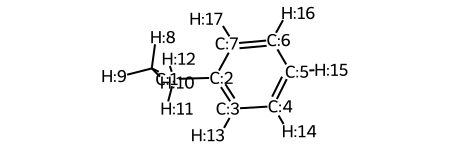
There are many different ways to show atom indices, all done in RDKit! Here are a few that are easy to show and might be helpful. This information comes from here.
# importing required packages
from rdkit import Chem
from rdkit.Chem.Draw import IPythonConsole
# defining the function
def show_atom_index(mol, label):
    for atom in mol.GetAtoms():
        atom.SetProp(label, str(atom.GetIdx()+1))
    return mol
You can then define a molecule and show the labels as you wish:
# showing the atom index in place of the atoms
molecule = Chem.MolFromSmiles('c1ccccc(C(N)=O)1')
show_atom_index(molecule, 'atomLabel')
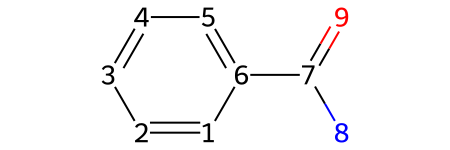
# showing the atom index along with the atoms
molecule = Chem.MolFromSmiles('c1ccccc(C(N)=O)1')
show_atom_index(molecule, 'molAtomMapNumber')
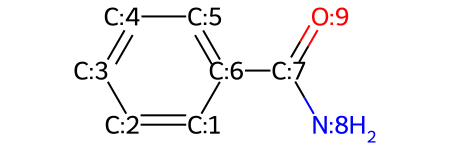
# showing the atom index on top of the atoms
molecule = Chem.MolFromSmiles('c1ccccc(C(N)=O)1')
show_atom_index(molecule, 'atomNote')
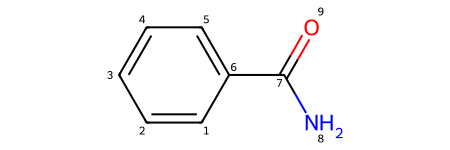
In addition to labeling the atoms, you can keep track of what atoms are next to each other with RDKit. The atoms keep track of their neighbors with:
# select an atom of interest
atom = m2.GetAtomWithIdx(0)
# find teh neighbors of the atom
neighbors = [x.GetAtomicNum() for x in atom.GetNeighbors()]
neighbors
This code will give the output showing atomic number of the atoms that are neighboring atom with index 0:
[6, 1, 1, 1]
From this, you can see that atom 0 has 4 neighbors, one bond to carbon and three to hydrogen.
You can also use RDKit to chekc to see if an atom is in a ring or not:
#Can check if in a ring?
m2.GetAtomWithIdx(1).IsInRingSize(6)
False
For other RDKit properties, check out the documentation!
Step 3: Other RDkit Descriptors
There are a lot of descriptors that RDKit can find or calculate, so many that they have a whole package for them!
from rdkit.Chem import Descriptors
With this package, you can find descriptors for your key molecules, benzoid acid in this case:
# define a molecule from a SMILES string
m = Chem.MolFromSmiles('c1ccccc1C(=O)O')
# find the total polarizable surface area (TPSA)
print('TPSA:', Descriptors.TPSA(m))
# find the molecular weight of your molecule
print('ExactMolWt:', Descriptors.ExactMolWt(m))
This code will give the output:
TPSA: 37.3
ExactMolWt: 122.036779432
You can also get graph descriptors from RDKit, which are helpful for predictive modeling.
# Graph Descriptors
from rdkit.Chem import GraphDescriptors
Here are some examples of descriptors you can get from this package:
# find the Balaban J index of the molecule
print('BalabanJ:', GraphDescriptors.BalabanJ(m))
# find the BertzCT index of the molecule
print('BertzCT:', GraphDescriptors.BertzCT(m))
# find the Hall-Kier alpha value of the molecule
print('HallKierAlpha:',GraphDescriptors.HallKierAlpha(m))
BalabanJ: 2.98145461404113
BertzCT: 203.415952604261
HallKierAlpha: -1.31
More than just graph descriptors, we can also work with molecular fingerprints in RDKit:
# Fingerprints
from rdkit.Chem import GraphDescriptors
from rdkit.Chem.AtomPairs.Pairs import GetAtomPairFingerprintAsBitVect
from rdkit.Chem import MACCSkeys
The code:
# find different kinds of molecular fingerprints
fp1 = AllChem.GetMorganFingerprint(m, 2) # radius, number of bits
fp2 = GetAtomPairFingerprintAsBitVect(m) # number of bits
fp3 = MACCSkeys.GenMACCSKeys(m)
# print the fingerprints
print(fp1, fp2, fp3)
will give you:
<rdkit.DataStructs.cDataStructs.UIntSparseIntVect object at 0x7fa779f8d900>
<rdkit.DataStructs.cDataStructs.SparseBitVect object at 0x7fa779f2b8b0>
<rdkit.DataStructs.cDataStructs.ExplicitBitVect object at 0x7fa779fa0900>
Right now, the fingerprints are still rdkit objects. To fix this, we can print the fingerprints as a list to see them how they would normally be represented in data science:
print(fp3.ToList())
[0, 0, 0, 0, 0, 0, 0, 0, 0, 0, 0, 0, 0, 0, 0, 0, 0, 0, 0, 0, 0, 0, 0, 0, 0, 0, 0, 0, 0, 0, 0, 0, 0, 0, 0, 0, 0, 0, 0, 0, 0, 0, 0, 0, 0, 0, 0, 0, 0, 0, 0, 0, 0, 0, 0, 0, 0, 0, 0, 0, 0, 0, 0, 0, 0, 0, 0, 0, 0, 0, 0, 0, 0, 0, 0, 0, 0, 0, 0, 0, 0, 0, 0, 0, 0, 0, 0, 0, 0, 0, 0, 0, 0, 0, 0, 0, 0, 0, 0, 0, 0, 0, 0, 0, 0, 0, 0, 0, 0, 0, 0, 0, 0, 0, 0, 0, 0, 0, 0, 0, 0, 0, 0, 1, 0, 0, 0, 0, 0, 0, 0, 0, 0, 0, 0, 0, 0, 0, 0, 1, 0, 0, 0, 0, 0, 0, 0, 0, 0, 0, 0, 0, 0, 0, 1, 0, 0, 1, 0, 1, 0, 0, 1, 1, 1, 1, 0]
Here is an example of how you can get key information from the fingerprint:
info={} # empty dictionary for molecular information
fp = AllChem.GetMorganFingerprint(m,2,bitInfo=info)
print('length of non zero elements:', len(fp.GetNonzeroElements()))
print('information of bits:', info)
print('bit on:', info[98513984])
# bit 98513984 is set three times: once by atom 1, once by atom 2,
# and once by atom 3, each at radius 1.
length of non zero elements: 16
information of bits: {98513984: ((1, 1), (2, 1), (3, 1)), 128522177: ((0, 2), (4, 2)),                     864662311: ((8, 0),), 864942730: ((7, 0),), 951226070: ((4, 1), (0, 1)),                     1466409066: ((5, 2),), 1510328189: ((7, 1),), 1533864325: ((8, 1),),                     1710869618: ((6, 2),), 2246699815: ((6, 0),), 2763854213: ((2, 2),),                      2784506312: ((6, 1),), 2994748777: ((5, 1),), 3217380708: ((5, 0),),
                     3218693969: ((0, 0), (1, 0), (2, 0), (3, 0), (4, 0)), 3999906991: ((3, 2), (1, 2))}
bit on: ((1, 1), (2, 1), (3, 1))
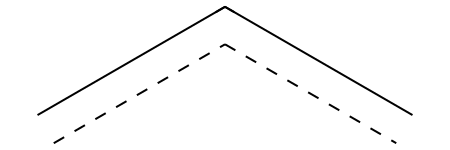
You can also get more information about the environment each atom is in with rdkit. This is done by looking at the different substructures within a molecule:
# atom 1, radius 1 of your molecule
env = Chem.FindAtomEnvironmentOfRadiusN(m,1,1)
# map from atom index in the molecule to the index in the subgraph
amap={}
# extract the subgraph
submol=Chem.PathToSubmol(m,env,atomMap=amap)
print('Number of atoms in substructure:',submol.GetNumAtoms())
print(amap)
print('substructure:', Chem.MolToSmiles(submol))
# can be used in finding important subtructures when modeling a reaction.
submol
Which will give the output:
Number of atoms in substructure: 3
{0: 0, 1: 1, 2: 2}
substructure: ccc
In addition to just 2D descriptors, you can also get 3D descriptors of molecules from rdkit.
#3D Descriptors
from rdkit.Chem import Descriptors3D
# set your molecule
m = Chem.MolFromSmiles('c1ccccc1C(=O)O')
m = Chem.AddHs(m)
AllChem.EmbedMolecule(m,randomSeed=0xf00d)   # need to get 3D coordinates
# find the 3D descriptors of the molecule
print('Asphericity:', Descriptors3D.Asphericity(m))
print('Eccentricity:', Descriptors3D.Eccentricity(m))
print('PMI1:',Descriptors3D.PMI1(m))
print('RadiusOfGyration:',Descriptors3D.RadiusOfGyration(m))
Asphericity: 0.4655222070385021
Eccentricity: 0.9727422264868102
PMI1: 127.14659990729236
RadiusOfGyration: 2.1193375600449276
Step 4: Substructure matching
You can also use rdkit to search molecules for specific patterns and/or functional groups:
m = Chem.MolFromSmiles('c1ccccc1C(=O)O') # can be done with chiral smiles to preserve chirality
patt = Chem.MolFromSmarts('C(=O)O')
print('Is substructure present?', m.HasSubstructMatch(patt), '\nAtoms in substurcture:',m.GetSubstructMatch(patt))
m
This will show the output of whether the substructure is there, as well as show the molecule with that substructure highlighted.
Is substructure present? True
Atoms in substurcture: (6, 7, 8)
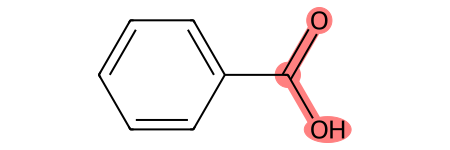
If the substructure appears more than once, you can print all instances of the match with the following code:
# define the pattern to search for
patt = Chem.MolFromSmarts('cc')
matches = m.GetSubstructMatches(patt)
# check if the substructure is present and what atoms are in it
print('Is substructure present?', m.HasSubstructMatch(patt))
print('Atoms in substructure:', m.GetSubstructMatches(patt))
Step 5: Chemical transformations
RDKit can use SMILES or SMARTS in order to "model" or define reactions. This can be helpflu for generation of a molecular or reaction library, or just getting starting structures for any reactions of interest. For example, you can define the reaction:
rxn = AllChem.ReactionFromSmarts('[C:1]=[C:2].[C:3]=[*:4][*:5]=[C:6]>>[C:1]1[C:2][C:3][*:4]=[*:5][C:6]1')
rxn

You can also get some information about the reaction, such as how many products and/or reactants are in the reaction:
print( 'number of reactant:', rxn.GetNumReactantTemplates())
print( 'number of product:', rxn.GetNumProductTemplates())
number of reactant: 2
number of product: 1
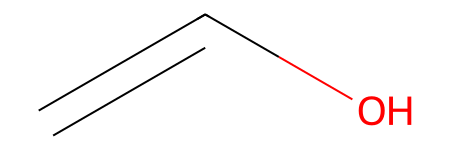
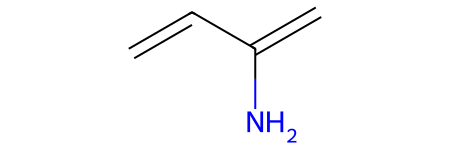
You can now apply this reaction to different molecules as long as they fit into the template. This template is for a Diels-Alder reaction, so if we input a diene and a dienophile, we can react the two to form the product:
# define the reactants
mols = [Chem.MolFromSmiles('OC=C'), Chem.MolFromSmiles('C=CC(N)=C')]
# visualize dienophile
mols[0]
# visualize diene
mols[1]
Now, we can perform the reaction between our two reactants:
# perform the reaction on our two molecules
ps = rxn.RunReactants((mols[0], mols[1]))
# print the SMILES of our product
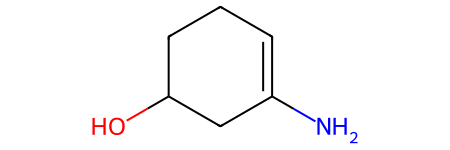
print('product:', Chem.MolToSmiles(ps[0][0]))
# visualize the product of our reaction
ps[0][0]
product: NC1=CCCC(O)C1
Note
For this particular reaction, there are multiple possible products. You can visualize
different products by changing the first call to index, or typing ps[1][0].
Step 6: Atom/Bond deletion/addition
Finally, you can use rdkit to manipulate molecules without necessarily being a part of the reaction. This can be done by changing the bonds or atoms within an existing rdkit mol object:
# define a molecule
m = Chem.MolFromSmiles('CC(=O)C=CC=C')
# make the molecule and editable molecule
mw = Chem.RWMol(m)
# add atom indices to the molecule
mol_with_atom_index(mw)
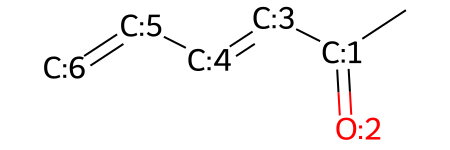
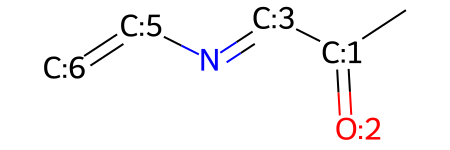
You can replace atoms wtihin your molecule:
# replace the atom with index 4 with a nitrogen atom
mw.ReplaceAtom(4,Chem.Atom(7))
mw
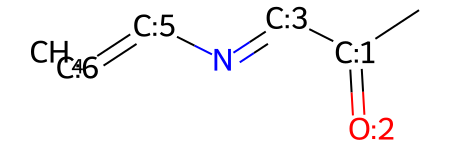
You can add atoms that weren't already there:
# add a carbon atom to the molecule
mw.AddAtom(Chem.Atom(6))
mw
You can do this multiple times, and it will just add the atom (with full valence) each time:
# add a carbon atom to the molecule
mw.AddAtom(Chem.Atom(6))
mw
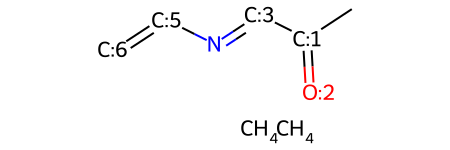
Adding two CH4's to the molecule probably isn't what we were intending to do. To add them as part of the molecule, we need to also add bonds.
# add a single bond between atoms with indices 6 and 7
mw.AddBond(6,7,Chem.BondType.SINGLE)
mw
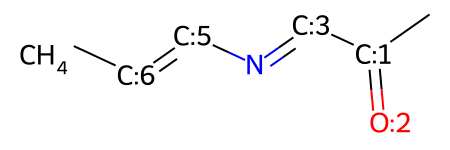
You can do this as many times as you need, even changing the type of bond that you're adding:
# add a double bond between atoms with indices 7 and 8
mw.AddBond(7,8,Chem.BondType.DOUBLE)
mw
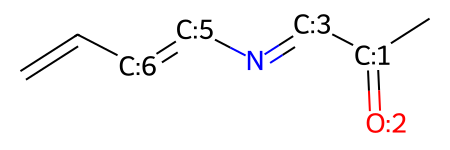
From here, we can now make a ring and connect more of our atoms, so long as we know the indices:
mw.AddBond(8,3,Chem.BondType.SINGLE)
mw
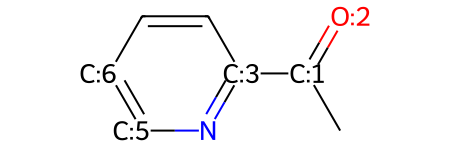
Maybe you realize now that you want an aldehyde instead of a ketone in your molecule. To do this, you just need to remove the atom that you don't want to include anymore:
# remove atom with index 0
mw.RemoveAtom(0)
mw
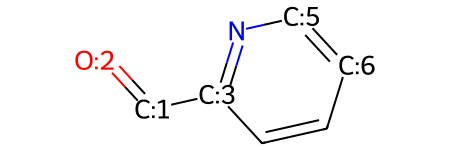
You can now check the number of atoms in your molecule to make sure that it's what you want:
mw.GetNumAtoms()
8
There are a lot of things that you can do with RDKit, this is just meant to be an introduction to some of the things RDKit can do and how to work with mol objects. Check out the documentation for a list of more functionalities of RDKit!
Modred: a descriptors package
Modred is used to collect important chemical descriptors
https://github.com/mordred-descriptor/mordred
from rdkit import Chem
from mordred import Calculator, descriptors
# create descriptor calculator with all descriptors
calc = Calculator(descriptors, ignore_3D=True)
print('all descriptors:', len(calc.descriptors), '\nnon 3D descriptors:',
    len(Calculator(descriptors, ignore_3D=True, version="1.0.0")))
all descriptors: 1613
non 3D descriptors: 1612
mol = Chem.MolFromSmiles('c1ccccc1')
calc(mol)[:3]
[4.242640687119286, 3.9999999999999996, 0]
# calculate multiple molecule
mols = [Chem.MolFromSmiles(smi) for smi in ['c1ccccc1Cl', 'c1ccccc1O', 'c1ccccc1N']]

# as pandas
df = calc.pandas(mols)
df['SLogP']
0    2.3400
1    1.3922
2    1.2688
Name: SLogP, dtype: float64
#https://github.com/mordred-descriptor/mordred/tree/develop/examples for examples
Morfeus: a descriptors package
Morfeus is used to collect chemical descriptors
https://github.com/kjelljorner/morfeus
- Bite angle
- Buried volume
- Conformer tools
- Dispersion descriptor
- Exact ligand cone angle
- Ligand solid angle
- Local force constant
- Pyramidalization
- Solvent accessible surface area
- Sterimol parameters
- XTB electronic descriptors
from morfeus import BuriedVolume, Dispersion, SASA, Sterimol
m = Chem.MolFromSmiles('c1ccccc1C(=O)O')
m = Chem.AddHs(m)
AllChem.EmbedMolecule(m,randomSeed=0xf00d)   # need to get 3D coordinates

#need xyz coords and elements
coords = m.GetConformers()[0].GetPositions()
elements = np.array([atom.GetSymbol() for atom in m.GetAtoms()])

atom1 = 1
atom2 = 3

#Buried Volume
bv = BuriedVolume(elements, coords, atom1, z_axis_atoms=atom2)
bur_vol = bv.buried_volume
print('Buried Volume:', bur_vol)

#Dispersion - the molecular surface is constructed from vdW spheres and an internal D3 code is used.
#Can change radii and D4 corrections
disp = Dispersion(elements, coords)
disp.print_report()

#SASA
sasa = SASA(elements, coords)
sasa.print_report()

#Sterimol
sterimol = Sterimol(elements, coords, atom1, atom2)
sterimol.print_report()
Buried Volume: 89.27842130648575
Surface area (Ų): 170.1
Surface volume (ų): 150.6
P_int (kcal¹ᐟ² mol⁻¹ᐟ²): 16.4
Probe radius (Å): 1.4
Solvent accessible surface area (Ų): 283.6
Volume inside solvent accessible surface (ų): 394.9
L         B_1       B_5
4.89      1.70      4.88
from morfeus import XTB
#conda config --add channels conda-forge
#conda install xtb-python
xtb = XTB(elements, coords)
print('IP:', xtb.get_ip())

print('IP corrected:', xtb.get_ip(corrected=True))

print('EA:',xtb.get_ea())

print('HOMO:',xtb.get_homo())

print('charges:', xtb.get_charges())

print('Bond order between 1 and 2:', xtb.get_bond_order(1, 2))

print('Dipole:', xtb.get_dipole())

print('Electrophilicity:', xtb.get_global_descriptor("electrophilicity", corrected=True))

print('Nucleophilicity:', xtb.get_global_descriptor("nucleophilicity", corrected=True))

print('Electrophilicity:', xtb.get_fukui("electrophilicity"))

print('Nucleophilicity:',xtb.get_fukui("nucleophilicity"))
IP: 14.21907376745269

IP corrected: 9.37307376745269

EA: 4.845571590387933

HOMO: -0.41623955979447214

charges: {1: -0.023731318132732028, 2: -0.023806077539105235, 3: -0.018447089674853395, 4: -0.025961908777158052, 5: -0.015545768011596933, 6: -0.0042367614165342155, 7: 0.3485846814351815, 8: -0.41382958434066375, 9: -0.4024772967915211, 10: 0.05934658603981254, 11: 0.040052712074922316, 12: 0.04553152875917119,  13: 0.043574951519552735, 14: 0.06536032181985, 15: 0.32558502303567083}

Bond order between 1 and 2: 1.4531011522314383

Dipole: [-0.72609434  0.87239314  0.17591641]

Electrophilicity: 1.1714735771171472

Nucleophilicity: -9.37307376745269

Electrophilicity: {1: 0.03911773287813523, 2: 0.026346314554852417, 3: 0.06454830639292795, 4: 0.02786250448009861, 5: 0.03376261308410905, 6: 0.05222019595834877, 7: 0.07074874851467716, 8: 0.171583858476282, 9: 0.07271258423075233, 10: 0.06680704294355236, 11: 0.07681263223202173, 12: 0.08592262797262706, 13: 0.07621979888353578,  14: 0.06477217961589259, 15: 0.07056285978219684}

Nucleophilicity: {1: 0.04377913232024513, 2: 0.04531234210302857, 3: 0.02905922254817471, 4: 0.044454767912915666, 5: 0.03748785231291066, 6: 0.03691186476868924, 7: 0.021635431859494292, 8: 0.1786549461532222, 9: 0.07648297999552217, 10: 0.07833353457469319, 11: 0.09660677617261712, 12: 0.08845612247521087, 13: 0.0904851465534236, 14: 0.07415823218296759, 15: 0.05818164809002663}
DBstep: a descriptors package
DBstep is used to collect sterimol descriptors
from dbstep.Dbstep import dbstep
m = Chem.MolFromSmiles('c1ccccc1C(=O)O')
m = Chem.AddHs(m)
AllChem.EmbedMolecule(m,randomSeed=0xf00d)   # need to get 3D coordinates
mol_with_atom_index(m)
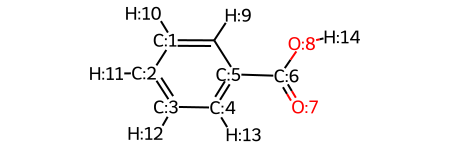
Et_sterics = dbstep(m2, sterimol=True,volume=True, atom1=7, atom2=6)
 R/Å     %V_Bur     %S_Bur       Bmin       Bmax          L
3.50      37.08       0.00       1.68       6.41       4.30
Et_sterics = dbstep(m2, sterimol=True,volume=True, atom1=7, atom2=6, scan='0:5:1')
   R/Å     %V_Bur     %S_Bur       Bmin       Bmax          L
  0.00       0.00       0.00       1.68       6.37       1.00
  1.00     100.00     100.00       1.68       5.73       2.00
  2.00      84.43      52.96       1.65       4.70       3.00
  3.00      48.43      22.15       1.54       4.37       4.00
  4.00      29.54      11.75       0.29       3.63       4.30
  5.00      18.97       4.70       0.00       1.86       4.30

L parameter is  4.30 Ang